Tuesday 29 October 2024

Sally

 Time for Sally to join the rest of the Nightmare Before Christmas crew! 

You can download the pattern pieces HERE or screenshot from the bottom of the post.


The eyes are attached with a black stem stitch outline. The lashes are side by side straight stitches. I did an extra layer of black stem stitch at the top of the eye to make a thicker line.

Scars are black stem stitch with uneven straight stitches. The nose is blue stem stitch. The lips are red satin filled then outlined in stem and the pupils are big old french knots. 


I attached the top of Sally's hair with a red back stitch. Add the back of the head with a light blue blanket stitch and stuff before you close the top. Use a red blanket stitch to add the long hair. Don't' forget to add a hanging loop at the top.


Use black stem and straight stiches for more scars then close up the back of Sally's torso with a light blue blanket stitch. For the dress top pieces, use a black cross stitch to attach the two pieces then black stem for the swirls.
I stuffed Sally's torso a little bit then glued the dress top in place. You can stitch it down if you prefer.
Blanket stitch the bottom of the dress pieces closed and stuff before closing all the way.
I glued Sally's neck to her head but this could also be stitched on if you prefer.
I also glued her hair down to the back of the dress.

Time to add Sally to the Tree!!!


Monday 16 September 2024

Halloween Stitch-A-Long 2024


Welcome to the Halloween Stitch for 2024!
I'm going to try some different things this year...mainly with felt.
Can't wait to see what you do!!

Download the Pattern HERE

Or screen shot it below

STAY SPOOKY!!!!

Friday 29 December 2023

Embroidery Journal 2024


In 2020 I decided to join an embroidery journaling group and document what turned out to be one of the weirdest years of my life. It's a bit of a commitment but I love how my kids will stand in front of the hoop and say "Remember this and remember that".
I did write a list of what each icon meant that is tucked into an envelope on the back of the hoop in case I forget.

I've decided to do it again for 2024.
If anyone wants to join in and needs a template please feel free to use mine.
You print the picture below or download the file HERE


Tuesday 12 December 2023

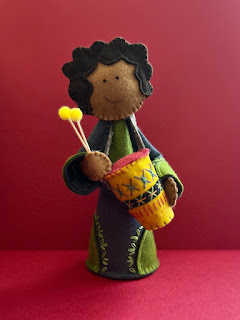
Drummer Boy ~ A THANK YOU for the Nativity Makers


This whole pattern making thing has been a BIG, unexpected adventure. I know I've told the story a million times but here it is one more. My dad passed away when I was pregnant with my youngest. My mom came out after she was born and stayed with us for three months. She needed a baby to cuddle!! 

When Mom was here I was making my daughter a hat. Mom asked if I would like her to jazz it up with a few embroidery stitches. My mom is a beautiful hand sewer. She taught herself to smock and then launched her own smocking design business when I was a kid. She tried to teach me to smock once and we quickly put the project away (it was so bad) and never talked about it again. She offered to show me how to embroider but I was a bit weary. She showed me the blanket stitch and lazy daisy. To say "I was hooked" is an understatement.

The Swallow~ My first pattern

The Nativity was a suggestion from my sister and the first set I completed was made for my mom. It's by far been my most popular creation. I've made friends all over the world who have made the Nativity. Getting the photos of everyone's creations has been amazing!! My little Etsy shop helped keep my family afloat during the pandemic lockdowns so I am truly grateful to everyone who has supported me. 

The Nativity

I've had a few Nativity makers ask me for a Drummer. As a BIG THANK YOU and a little Christmas present, I'm giving away the Drummer to everyone on here. My plan was to make a full pattern for the Drummer but time is ticking and Christmas is almost here so I'm going to pop all of the pattern pieces on here and quickly go through the steps. If you have made any of my other Nativity pieces this should be pretty easy for you to put together.

The Drummer Boy

Download the pattern pieces
If you have any trouble with the download (Google Drive seems to not like phones and iPads sometimes) please just shoot me an email and I can email you back with the pattern pieces.
elliottsplayground@gmail.com

Supply List
Felt- I used dark grey, avocado green, yellow, red, dark tan, dark brown, black and grey
Floss - Black 310, Chartreuse 704, Red 666, Brown 433, Green 905, Blue 995, Orange 740
Scissors
Stuffing
Small piece of cardboard (approx the size of Piece A)
Some weights like fishing weights or nuts/bolts
Hot Glue Gun and Glue Sticks
Wire or Pipe Cleaners
 2Toothpicks
2 small pompoms


Attach the embellishments (Pieces K and L) to the Robe (Piece J) with a chartreuse backstitch along the edge. Add chartreuse lazy daisies around each edge.
Close the cone with a black blanket stitch and stuff.
Hot glue a piece of cardboard and waits to the inside of the bottom of the robe (Piece M).
Attach the bottom (weighted side in) with a black blanket stitch.
Add embellishment (Piece D) to each sleeve (Piece C) just like the embellishments on the robe.


Use a black blanket stitch to make the sleeves into cones. 
Stitch the hands (Piece E) together with a brown blanket stitch. Leave the top (wrist area) unstitched.
Cut wire or pipe cleaner to tuck inside each hand then fit inside the length of the sleeve. Hot glue the hands in place with a spot of glue inside the wrist. Then add a spot of hot glue and carefully stick the wire up inside the sleeve.
Fold the arms where it feels like the elbows would be.
Add the drum embellishment (Piece I) to the body of the drum (Piece H) with chartreuse cross stitches. Add an orange running stitch over the middle of each cross stitch.
Add red side by side straight stitches all along the bottom of the drum.
Add green cross stitches along the top of the drum with small blue cross stitches in the centre of each green cross stitch.
Use a yellow blanket stitch to close the drum.


Add the top of the drum (Piece F) with a red blanket stitch then stuff.
Add the bottom of the drum (Piece G) with a green blanket stitch.
Use a cross stitch on each side of the drum to attach the drum strap (Piece I).
Stitch the points of the arms to the top of the cone. Slide the strap of the drum over the top of the cone. 


Cut the point end off the toothpicks. Carefully use hot glue to add a pompom to the end of each toothpick.
Adjust the bend in the arms to have one hand higher at the top of the drum and one hand that looks like it's holding onto the bottom of the drum. Put a very thin line of hot glue under the arm, press against the body and hold until dry. This will also glue the drum into place so make sure everything is lined up the way you like it before you glue.
Add a drop of hot glue inside your drummer's hand then wrap the hand around the drumsticks. Hold until dry.


Give your drummer's face (Piece A) a brown stem stitch smile and black french knot eyes. Attach the front hair (Piece B) to the face with a black back stitch along the hairline.
Stitch the back face (also Piece A) onto the front face with a brown blanket stitch. The chin area will look better if your stitches are a bit smaller than mine were. 
Make sure to stuff a little before you stitch shut completely. 
Pop the back hair (Piece N) on with a black blanket stitch. Leave the bottom unstitched.
The back hair will make a little pocket. Add a drop of hot glue into the pocket then slide the head onto the top of the robe. 
Once the glue is dry, your Drummer Boy is finished and ready to join the Nativity!!

Saturday 11 November 2023

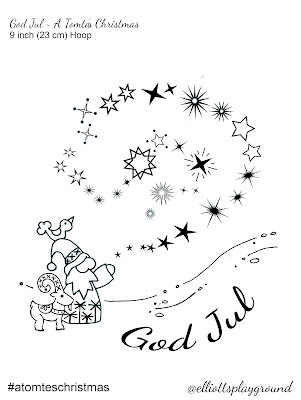
A Tomte's Christmas 2023


It's that time of year again!!!

Christmas Stitch-a-long!!!!!

Download the 2023 Pattern - HERE!    
If you have any problems downloading the pattern please shoot me a message on facebook or instagram or email elliottsplayground@gmail.com and I am happy to email you a copy. I know sometimes google drive does not like downloading into phones or tablets. Not sure why?? But again, happy to email if you have download problems.
Or you can screenshot from the images at the bottom of this post.

This is the order I am planning to stitch in but feel free to go in any order you want to!!
I can't wait to see what you stitch!!

~Clara


Friday 3 November 2023

Boo Stitch Complete

The Halloween Stitch-a-long for 2023 is done! Thank you so much for everyone who joined in. It was so fun to see everyone's stitches. 

The main stitches that I used throughout were satin stitch and stem stitch. I filled the icons with satin and outlined with stem.
Colour was left up to each stitcher and we got some beautiful palettes!! 

Here are some beautiful examples from stitchers on instagram. 

Happy Halloween and please join me in December for a Christmas SAL!!

Monday 2 October 2023

Uncommon Threads

The Jackalope


I'm very excited that two of my cryptid felt sculptures will be included in 
the Naarm Textile Collective Exhibition
Uncommon Threads

Uncommon Threads is a collaborative group exhibition of over 80 textile artists from Victoria.  The exhibition will showcase progressive art forms using textiles and exploring the relationship of textiles to other art disciplines. Our goal is to provide a contemporary exhibition exploring the limitlessness of textile art. 

The exhibition is being curated by Tamara Russell and introduces artists from the Naarm Textile Collective

The Bunyip

The exhibition will be held at FortyFive Downstairs located at 45 Flinders Lane, Melbourne, a location that has a rich history for textile production, design and innovation. This exhibition aims to update the Flinders Lane story with the inclusion of Contemporary Textile Art.  

Opening event Tuesday 17 October 5pm – 7pm      Closing date 28 October