Monday, 14 December 2020

Palms and Stables


For those of you working on the Nativity patterns I wanted to share some display ideas. 


I wanted to make a stable to display my Nativity but my wood working skills are subpar at best. I had about a gazillion cardboard boxes laying around, loads of dried out sticks in the back yard (I am constantly making my kids pick up sticks for one craft project or another) and my trusty glue gun. Cardboard stable, here we come! 

I got a whole lot of inspiration from this tutorial from Bright Apple Bottom


Here is a better view without any of the Nativity figures. It was really pretty easy. I started by gluing two pieces of cardboard together on a 90 degree angle. The back piece I cut on a slant to make for a pointy roof. I glued that to a small box that became the floor, added a roof and a little "porch" type area. Everywhere there was a seam I hot glued a stick over the seam. One curvy stick became the holder of my star. Once the glue was dry and dry brushed on some brown paint, added a little string of copper lights and voila! A stable! 

Even is you aren't doing the Nativity patterns these cardboard stables can be made small and are very sweet for Peg Dolls. My kids painted these pegs and glittered up the halos. We glued on some preserved reindeer moss. I love these especially because the kiddos helped.


I also thought a few simple palm-esque looking plants would be nice within the Nativity. 

I picked up four shades of green from my scrap bag and cut pointy strips that varied from about 8in (20cm) to 4in (10cm) and blanket stitched each piece together. I stopped stitching where each piece started to taper into a point.


Starting at the longest end, I rolled the strips, nice stitching on the outside, into a tube then stitched in place. 


The longer "fronds" fall over the smaller pieces giving the plants a bit of a palm or long grass look. I had lots of green scraps so cut out some splotches of random sizes and various shades to give the illusion of grass. My hot glue gun was put to use again making a little fence with more of my collected sticks.


I thought the plants and fence added a little something nice to the aesthetic outside the stable. 

I would LOVE to see how you display your Nativity! 
If you post any on Instagram or Facebook please add #elliottsplayground.

Seeing your creations brings me so much joy! Thank you to all of you for creating with me!! 


Saturday, 5 December 2020

Nativity Star


I wanted to pop together a few extra bits and pieces for those of you who are working on the Nativity. I thought we could start with the Star.

You can Download the template and Supply List


A quick stitch list!
Always use two strands of floss.
Blanket around the edges.
Fern Stitch from the points of the star in the middle and the valleys of the two middle stars as well.
French knots 
Lazy Daisies and Straight stitches in the smallest star.


My original plan was to have my Nativity set under the tree (just like Mom used to do) and hang the star from the lowest branch but my Nativity grew a bit too big.
I ended up glittering a small cardboard box and bamboo skewer and placing the Star in the back. 


I also went on a mini star making kick and when I make my next Nativity set I think I will pop in some small groups of stars as well as the big star.

Making a garland to drape behind the Nativity scene could be really pretty too! Please let me know if you have any other fun ideas!


Wednesday, 2 December 2020

Johanna Parker Design Christmas Cat

 I have been so fortunate to collaborate with Johanna Parker Design on some fun, vintage Halloween designs but I wanted to Christmas-fy (is that a word?) her iconic Black Cat.


I have added a new Bonus Pattern to the Etsy listing so if you haven't bought the Black Cat and Ghost Patch Pattern the bonus Christmas Cat is now included with your purchase.

For those of you who already have the patch pattern and all the instructions for making the Cat you can download the supplemental pattern HERE

Monday, 19 October 2020

Oogie Boogie

Making Zero was FUN!


My little one's next favourite character is Oogie Boogie so he needed to be on the Halloween tree as well. I wanted to share that pattern with you guys too! 


The stitches are (as always) very simple. 
Here is a close up of his face to give you a guide
You can download the pattern pieces, supply and stitch list below.


Here's a little look at Oogie's backside. He's very squishable! He turns out approximately 5x5in (13x13cm).  You can make him an ornament or a little toy to cuddle.


Oogie Boogie is on my Halloween tree, for now! Once I take the tree down to make way for some Turkeys my little miss gets him so he can join her Nightmare Before Christmas toy crew.

Enjoy!!


Tuesday, 22 September 2020

Zero Plushie Template

 My little one is a Nightmare Before Christmas SUPER FAN!! She lost her Zero toy so I decided to stitch her up a new one. 


Zero's shape is pretty simple which made life easier. I've drawn up a template for anyone else who wants to give it a go. The page is set to print as is on Letter or A4 paper.

Zero is almost 100% put together with blanket stitch. I only used back stitch for the Jack O' Lantern Face on Zero's nose and then straight stitches to make the twinkle in his eye.


Supply List
Felt- White (most of Zero is white so you will need two standard craft pieces. One for the pattern pieces and one for the 8x10in body)
Orange, Red and Black
Floss - White, Black, Red and Orange
Embroidery Needles
Stuffing
Scissors


Constructions Tips:
 Pop together the whole head together first leaving the bottom open 
to add the body. 
The pumpkin nose can be a little bit fiddly so be patient. It's much easier to add the Jack O' Lantern details BEFORE you sew the five orange pieces together. I figured that one out the hard way. 


Blanket Stitch around the whole edge of Zero's "body". I know this little guy is going to be loved to death very quickly but the stitching will make him a bit more durable.
Fold the body piece in the centre before you stitch it inside the head. This gives Zero's body the flowing feel.

If you have any other questions please leave a comment and I can help!


I would love to see any of your lovely creations if you decide to make a Zero. 
Enjoy!!


Thursday, 9 July 2020

Geometrics Giveaway!


6 MORE WEEKS IN LOCKDOWN!!!!!!!!!
The last time we went into lockdown I did a pattern Giveaway and it was fun!!
Here we are again AND it's Christmas in July. I am taking CIJ very seriously this year.
The tree is up! The kids and I made all the ornaments! 
And a letter arrived from Neville and CC (our Elves who reside on the Shelf) saying if the kids were really good there might be some treats in their stockings 25 July. The stockings are up in anticipation!! 
So, with all of the goings on I would like to share another pattern with all of you for FREE!!
The Geometrics Pattern was a labour of Love with my sweet friend, Francesco Bilotto. 
You guys may have seen him on The View or Good Morning America with all kinds of fabulous decorating advice. 


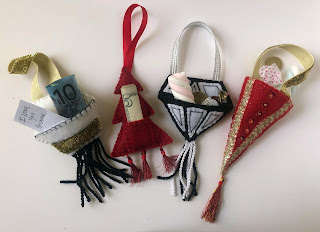
The shapes are classic and simple(great for beginning stitchers and kids!) but each ornament also has a little pocket to pop in a surprise!! 


The ornaments themselves can hold your gifts. I did a small tree mixed with photo ornaments for my kids (instructions for the photo ornaments are a few posts back). The pockets were filled with sweets and money. It all went over a treat!
We both hope you enjoy and Happy Christmas in July!!


Putz Houses

I Love Glitter!! 
LOVE IT!
So Putz Houses aka Glitter Houses have always been a favourite of mine.
I attempted to cut out my own patterns but straight lines and math are not my friends.
I ordered a set of precut houses from ItemsBox, a shop Lithuania. They sell on Etsy and Amazon.
The precut houses made life much easier!!
I usually try to keep all painting and glittering with the kids outside but it's COLD and rainy so the not only the putz houses but the inside of my house is now covered in glitter. Totally worth it though!


The tiny tree and reindeer buttons were from eBay. 
The snowman we made with Cornstarch/ Baking soda clay.
It's a really simple recipe and the clay comes out so white and beautiful!!
You can add essential oils too and make the clay smell nice.


And of course there were snails! Because who doesn't need a Christmas Snail??
Snails were my daughter's favourite thing to make from the clay. When I said, "I don't really want a snail on my house."
She said, "You have no Christmas Spirit!"
The snail went on the back. Haha!


Wednesday, 18 March 2020

Rooster Pattern


One of my favourite people asked me to make a Rooster Ornament for his sweet Mama.
I was pretty happy with how the Rooster turned out so decided to make a pattern.
I usually sell my patterns on Etsy but with all the craziness going on the world I thought I'd share this one with everyone for free.
I know crafting helps keep me sane. When I get anxious it definitely helps to get keep my hands busy. And some people need projects for all the isolation time.
So here you go!!!


This is a great project for scraps of felt. There are no super huge pieces and roosters come in so many colours it's a great one to let the creative juices flow!! No need to stick to my colour palette.

If you want to make more of my designs, all patterns are 30% off until 5 APR 2020.

I know this is a crazy time. We are all concerned about health as well as the financial fall out from all of this. But keep crafting! And be kind to each other. We can all face these new challenges together. Lord help me with home schooling. I really suck at it. I made my poor boy cry three times today but we will sort it all out!! 
Take care of each other.

I would love to see what you make!!
Please tag me on Facebook or Instagram
@elliottsplayground

Take care out there!!